iPod Classic Modding Guide
Last updated: 6 August 2025 at 15:13:22 UTC
Table of Contents
Introduction
This guide collects insights into modding the iPod Classic (5th, 6th, and 7th generation). I originally created it to collate the information I gathered during my own iPod modding journey. Think of this as a helpful starting point: it's not a complete, step-by-step manual, but it offers valuable resources and should help you get started with confidence.
Identify your iPod model
Information gathered from various sources12 around the web. Select the model that matches your iPod, or answer the questions to identify it if you're not sure.
iPod Identifier
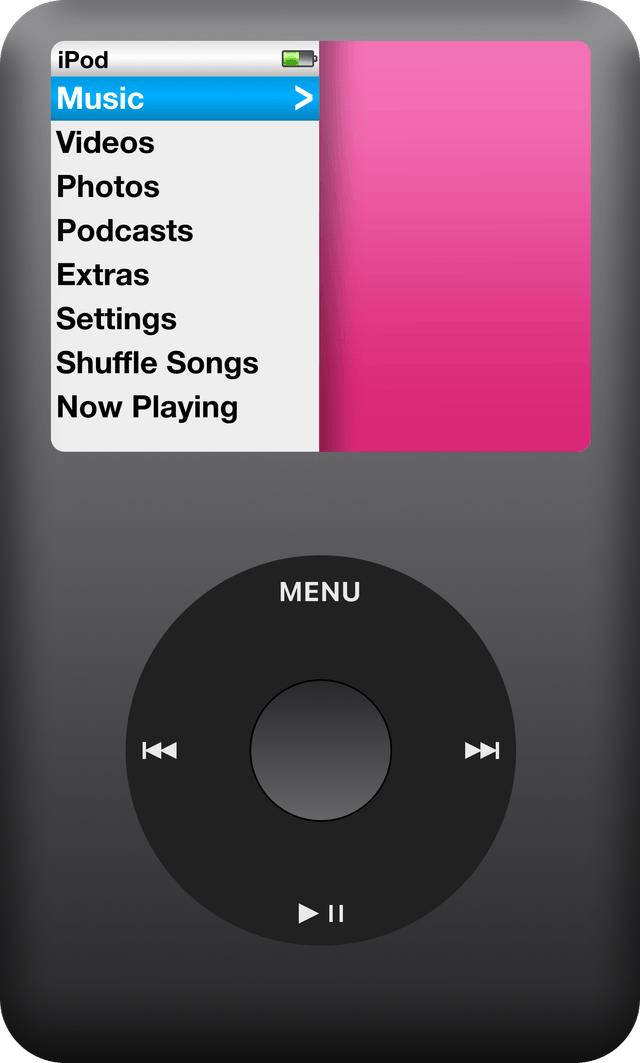
Thanks to ConiShadow in the iPod Discord server for supplying the graphics!
Opening your iPod
It's relatively simple to open an iPod. However, people notoriously struggle34 to open the 6th/7th generation models due to the metal front and back. If you know what you're doing, you should be able to get at the internals within a few minutes.
The iPod has 11 clips holding the front and back together. You'll need to disengage these clips with your pry tool (iSesamo or alternative) to access the internals.
YouTuber Geek Detour has created a reference card5 that you can print out to identify where the internal clips are.
Shopping list
- iFixit Essential Electronics Toolkit (or similar)
- iSesamo Opening Tool (or similar)
Video guide
Core hardware upgrades
Storage mod
Storage mods are quite simple to perform. However, you must consider:
- Which generation iPod you have
- Which other mods you're looking to implement
The answers to these questions will steer your choices when determining your storage adaptor.
Device storage limits
There are a few different limitations on the maximum storage capacity of iPods6 running the stock operating system.
A database of your iPod's files is loaded into RAM. A 32MB RAM iPod has a limit of around 20,000 items (songs, videos, etc.), whilst the 64MB RAM models have a limit of around 50,000. If you're not sure how much RAM your device has, use the iPod identifier.
You should also be aware that some generations (specifically 6/6.5) have a hard storage limit. However, you can flash newer firmware to bypass this.
Check out the compatibility table below for more details.
Storage upgrade compatibility table
| Supported | |
| Supported, but you'll reach the RAM's song limit before the storage limit | |
| Unsupported, but bypassable by flashing a newer firmware version | |
| Unsupported |
| Generation | Compatible upgrades | ||||
|---|---|---|---|---|---|
| 128GB | 256GB | 512GB | 1TB | ||
| 5 | 30GB | ||||
| 60GB | |||||
| 5.5 | 30GB | ||||
| 80GB | |||||
| 6 | 80GB | ||||
| 160GB | |||||
| 6.5 | 120GB | ||||
| 7 | 160GB | ||||
Storage adaptor options
There are a number of adaptors of varying prices and configurations. The table below outlines the most common choices with pros and cons. The adaptors are in preference order.8 Higher is better.
Storage adaptor comparison table
| Option | Image | Description | Price |
|---|---|---|---|
| iFlash Quad |  | Recommended Quad MicroSD Adaptor. Supports up to 4 MicroSD cards
| ~£36 |
| Generic MicroSD |  | Dual MicroSD Adaptor. Supports up to 2 MicroSD cards
| ~£38 |
| iFlash Solo |  | SD Adaptor. SD/SDHC/SDXC/UHS-1 U1 & U3 Card Compatible
| ~£29 |
| iFlash CF |  | CF Adaptor. Supports CF (Compact Flash) cards
| ~£15 |
| iFlash Dual |  | Dual SD Adaptor. Supports up to 2 SD cards
| ~£33 |
| iFlash Sata | | mSata Adaptor. Supports mSATA SSDs
| ~£34 |
| Generic CF |  | CF Adaptor. Supports CF (Compact Flash) cards
| ~£3 |
| Generic m.2 |  | m.2 Adaptor. Supports m.2 SSDs
| ~£5 |
| Generic mSATA |  | mSata Adaptor. Supports mSATA SSDs
| ~£4 |
Battery mod
You'll need to Open your iPod first. Then, follow the video guide below for battery replacement.
Video guide
Battery & Storage Compatibility
Not all batteries are the same. Due to the variance in their dimensions (width, height, depth), you may find yourself trying to install a battery that doesn't fit into your device.
thick backplate iPods have the extra depth to accommodate all battery & storage combinations.
thin backplate iPods have less space, and therefore choice is more limited.
This table should help guide you on which battery to choose.10
Battery & iFlash compatibility table
| Compatible | |
| Incompatible |
| Battery Mod | Storage Adaptor | thin | thick |
|---|---|---|---|
| 650mAh (OEM) | iFlash Solo | ||
| iFlash Dual | |||
| iFlash Quad | |||
| iFlash Sata | |||
| Generic MicroSD | |||
| 2000mAh (square) | iFlash Solo | ||
| iFlash Dual | |||
| iFlash Quad | |||
| iFlash Sata | |||
| Generic MicroSD | |||
| 2000mAh (rectangle) | iFlash Solo | ||
| iFlash Dual | |||
| iFlash Quad | |||
| iFlash Sata | |||
| Generic MicroSD | |||
| 2800mAh (rectangle) | iFlash Solo | ||
| iFlash Dual | |||
| iFlash Quad | |||
| iFlash Sata | |||
| Generic MicroSD | |||
| 3000mAh (thin) | iFlash Solo | ||
| iFlash Dual | |||
| iFlash Quad | |||
| iFlash Sata | |||
| Generic MicroSD | |||
| 3000mAh (thick) | iFlash Solo | ||
| iFlash Dual | |||
| iFlash Quad | |||
| iFlash Sata | |||
| Generic MicroSD |
Identifying battery dimensions
Batteries should have a 6-digit code printed on their front which can be used to identify their dimensions. For example, the code 785239 can be broken down to 78mm width, 52mm height, 3.9mm depth.
Cosmetic mods
Faceplate Replacement
This section is currently a work in progress.
If you have experience with this area and would like to contribute, please check out the Corrections & Contributions section.
Screen Replacement
This section is currently a work in progress.
If you have experience with this area and would like to contribute, please check out the Corrections & Contributions section.
Backplate Replacement
This section is currently a work in progress.
If you have experience with this area and would like to contribute, please check out the Corrections & Contributions section.
Advanced mods
These mods are typically more complex than battery or storage mods which are mostly swapping parts. These mods will require soldering wires to parts of your iPod's circuit board. Therefore you will need a soldering iron and wires.
Bluetooth mod
There are a few routes that you can take when implementing a Bluetooth mod. Each of these approaches focuses on a different method of interacting with the Bluetooth board. In theory, you could swap out the Bluetooth transmitter that each guide uses in favour of one you prefer. However, you may need to make adjustments for it to work.
Oxyll's "elegant Bluetooth" mod
This is the most technically complex mod, but in my opinion the most preferrable. There are no visible changes to the hardware, and Bluetooth connection is managed via the clickwheel.
This section is currently a work in progress.
If you have experience with this area and would like to contribute, please check out the Corrections & Contributions section.
IcyEgg-9339's "Right Way" mod
IcyEgg-9339's Reddit post isn't the first demonstration of this approach, however there has been some chatter about it on Reddit recently, and the author gave plenty of details for users to get started.
With this mod, you'll affix a button below the lock switch, which you can then press or hold to manage Bluetooth. This means that you're still able to use the lock switch as you did before, with additional functionality.
It uses the board from a UGREEN CM672 Bluetooth adaptor, which is compatible with AirPods Pro 213.
Shopping list
UGREEN CM672 technical details
Reddit user RyuHyabusa77 has produced a great diagram that describes the points on the board. You can follow their journey in this thread, where they supplied some more details which may be found useful.

This wiring diagram was initially shared sometime in April 202414, but the original author is unknown.

Parts Plus Pods Bluetooth mod
This mod is the cheapest option, mainly because the KCX_BT_EMITTER board is less than £1.
The Parts Plus Pods YouTube channel has multiple videos demonstrating how to implement this mod. If you would prefer not to do this mod yourself, their store also sells "kits" at a reasonable price which have Bluetooth and an upgraded battery.
Shopping list
Video guide
Taptic mod
If you'd like to contribute information on taptic mods, please see the Corrections & Contributions section.
Video guide
Software mod
This section is currently a work in progress.
If you have experience with this area and would like to contribute, please check out the Corrections & Contributions section.
Bypassing 6th generation storage limits
Reddit user Olsro16 has produced a guide on how to flash newer firmware versions onto your device. This means you'll be able to increase the storage on your 6th generation iPod up to 2TB.6
Software checklist
- iTunes 12.10.11.2 (newer versions won't work)
- Rockbox Utility
- iPod firmware 2.0.2
- Olsro's custom Rockbox build
- Olsro's iPod SysCFG Editor
Rockbox
Is Rockbox right for me?17
If you have ever thought the following:
- I want to drag and drop music, no iTunes!
- I want to theme the UI!
- I want games and emulators!
- I want to play FLACs!
Rockbox is for you.
If you have ever thought the following:
- I'm ok with iTunes!
- I want less hassle with getting album art to show up!
- I want smooth animations of the stock UI!
- I don’t want bloat in my firmware!
iPodOS is for you.
Installing Rockbox
Installing Rockbox is a straightforward procedure. Check out the video guide below for the setup steps.
Software checklist
- iTunes 12.10.11.2 (newer versions won't work)
- Rockbox Utility
Video guide
Once you've done this, you can begin customising your device, such as by installing themes.
Installing games
Reddit user Olsro16 (again!) has started a project to preserve iPod games. Follow the guide there to install (almost) all of the original iPod games on your device.
Troubleshooting & Support
Debugging
Force restart18
- Put the Hold switch firmly in the unlocked position.
- Press and hold the Menu and Select (Centre) buttons for 8 seconds, or until you see the Apple logo.
DFU Mode19
- Connect the device to a computer using a USB cable.
- Hold down both the Select (Centre) and Menu button.
- The device will reboot. Keep holding both buttons.
- After 8 seconds, release both buttons.
Disk mode20
- Set your iPod on a flat surface and make sure your iPod has a battery charge.
- Slide the Hold switch on and off.
- Perform a force restart.
- Press and hold the Select (Centre) and Play/Pause buttons until you see the disk mode screen. Make sure you press the Play/Pause buttons towards the outside of the click wheel and not near the centre.
- Connect your iPod to your computer. The screen on your iPod should display Do not disconnect. Make sure you eject your iPod in iTunes before you disconnect it from your computer.
Debug mode21
- Perform a force restart.
- Immediately after the Apple logo appears, hold down the Previous Track and Select (Centre) buttons.
- The screen should display the Apple logo. Once the screen turns white, it is safe to release the two buttons.
Checking HDD Health
Sometimes your iPod can begin to act strangely or sluggish. Album artwork may disappear, it may struggle to load songs, or report back that your storage capacity is much lower than it should be. These can often be an indication that your HDD health is declining.
The iPod itself offers a diagnostic "HDSMARTData" report to gather some stats on your HDD. To do this follow the steps below:
- Put your iPod into debug mode
- Press Menu for "Manual Test"
- Select "IO"
- Select "HardDrive"
- Select "HDSMARTData"
This will run a S.M.A.R.T report on your iPod's HDD. We care about the Retracts, Reallocs, and Pending Sectors. Check out the below table for details on what those mean.
S.M.A.R.T attribute glossary
| Attribute | Description |
|---|---|
| Power-off Retract Count (Retracts) | The number of power-off or emergency retract cycles. Lower is better. |
| Current Pending Sector Count (Pending Sectors) | A count of bad sectors that have been found and re-mapped. Lower is better. |
| Reallocated Sectors Count (Reallocs) | Count of reallocated sectors. The raw value represents a count of the bad sectors that have been found and remapped. Thus, the higher the attribute value, the more sectors the drive has had to reallocate. This value is primarily used as a metric of the life expectancy of the drive; a drive which has had any reallocations at all is significantly more likely to fail in the immediate months. Lower is better. |
Reallocs will have an upper threshold before total drive failure. We don't know what this value is for an iPod hard drive, but if the number you see isn't 0, it is significantly more likely to fail. If you're noticing issues and see a high count, it may be easier to replace the drive. Check out Storage mod for more information.
FAQ
My screen shows a circled red X and a support link, what's happened?

This usually means a hard drive failure.22 You can confirm this by putting the iPod into debug mode and checking the hard drive status. Possible issues:
- The hard drive is not connected properly.
- The connector is damaged.
- The hard drive is damaged or has failed.
Can I put an 6th/7th gen faceplate on my 5th generation iPod?
Yes. However, you'll also need to transplant 6th/7th gen parts:
- The midframe.
- (optional) The clickwheel plastic. You can skip this, but if you do, the clickwheel won't sit flush with the faceplate.232425 This video guide should help you understand how to do this. As you can see, the centre of the plastic wheel has a slightly increased depth.

I've added music to my iPod, and now it's slow/crashes when I turn it on
You're probably nearing or have reached the maximum number of songs your iPod can handle. 32MB RAM models are limited to around 20,000 songs, whilst 64MB RAM models are limited to around 50,000. Identify your iPod model to understand your device's limits.
I've tried to check my SMART data and I see "Error"
This is likely a faulty hard drive. If the device is modded, check that ribbon connections are seated correctly. If it's not modded, you will need to replace the drive. Check Storage mod for more information.
I've checked my SMART data because my iPod is behaving strangely. What is "bad"?
Read the Checking HDD Health section for information on what your SMART report means.
My clickwheel centre button isn't working
The foam pad behind the clickwheel can shift out of alignment, preventing the button from clicking in correctly.
You'll need to disassemble your iPod and recentre (or replace) the foam pad26. As you can see in the image below, there is a black foam pad over each button. Ensure that these are centred.

I installed Rockbox and can't get back to iPodOS
You can access iPodOS by performing a force restart, and once the screen goes blank, flip the lockswitch on.
There's a black mark on my screen, what is it?
This is usually caused by the battery swelling behind the screen, creating a pressure spot. Batteries can swell because of physical damage, defects, or just age (the most common for these devices). The best course of action is to properly dispose of the battery, and replace it with a new one. Check out the Battery mod section to guide you on replacement.

Communities
Discord
Corrections & Contributions
This guide is a community effort. It is compiled from a markdown document on Github. If you've spotted an error or would like to contribute to the guide, feel free to raise an issue or create a pull request.
Reference
Footnotes
-
https://www.reddit.com/r/ipod/comments/1mi9i8n/looking_for_someone_to_replace_battery_of_ipod/ ↩
-
https://www.reddit.com/r/IpodClassic/comments/1m6kfc2/fuck_my_life/ ↩
-
https://www.dropbox.com/scl/fi/9dbq097ahx8lfyhed06sg/iPod-Classic-Openning-Reference-Card.pdf?rlkey=gs189u4t2axulvz0h3f3nlg8y&e=2&dl=0 ↩
-
https://dcg-ipod.affinityco.net/blogs/help-2/kb-40011-flash-modding-ipod-classics-compatible-capacities ↩ ↩2 ↩3
-
https://www.reddit.com/r/ipod/comments/15y29wm/comment/jxawsp1/ ↩
-
https://www.iflash.xyz/runtime-shootout-2016-quad-dual-solo-msata-vs-original-hard-drive/#attachment_8774 ↩
-
https://www.reddit.com/r/ipod/comments/1at1uoj/comment/kqwrjbx/ ↩
-
https://www.reddit.com/r/ipod/comments/1hdi1le/comment/mi40quh/ ↩
-
https://www.amazon.co.uk/gp/customer-reviews/R23F4I6RJXG6PT/ref=cm_cr_getr_d_rvw_ttl?ie=UTF8 ↩
-
https://old.reddit.com/r/ipod/comments/1kztic2/the_right_way_to_bluetooth_mod_your_ipod_classic/mw3s96r/ ↩
-
Like Olsro's work? Consider donating! https://www.patreon.com/Olsro ↩ ↩2
-
Perfect summary lifted from the FAQs of the iPod Discord community ↩
-
https://theapplewiki.com/wiki/DFU_Mode#iPod_classic_.286th_generation.29.2C_iPod_nano_.282nd.2C_3rd.2C_4th.2C_and_5th_generation.29.2C_iPod_shuffle_.282nd.2C_4th_generation.29 ↩
-
https://www.ifixit.com/Guide/How+to+put+an+iPod+Classic+into+Debug+mode/139818 ↩
-
https://discussions.apple.com/thread/5044739?answerId=22067446022&sortBy=rank#22067446022 ↩
-
https://www.reddit.com/r/ipod/comments/y5gars/comment/isju73x/ ↩
-
https://www.reddit.com/r/ipod/comments/zzvxqc/comment/j2e3kkh/ ↩
-
https://www.reddit.com/r/ipod/comments/osgws4/comment/h6qm017/ ↩